Friday, December 30, 2011

Final Order of 2011!

As 2011 draws to a close I finish our final custom order (and right on time too!)  The unsurprisingly popular armwarmers we've taken to making are finally done, but not without some troubleshooting.  The original pattern, by Coty Cockrell, features a differently stitched gusset (which we changed in this version to match the 1x1 ribbing of the rest of the body of the armwarmer) and is "generically" sized.  We've figured out a custom sizing system which is working quite well.

The other changes I had hoped to make - including creating it in Seed Stitch - did not quite work.  The drawing up of the ribbing cinched the size to a more fitted constituency (hence why your socks generally have a ribbed pattern on the cuff), Seed Stitch does not do this, leaving the fabric flat and unstretched...and decidedly longer when cast on at the same amount.  After started twice and frogging twice it was decided that this order (which had a definite finite deadline) was not the time to experiment.  Though we hope to in the future...


The variegated yarn also made for a fun odd diagonal stripe pattern!


Happy Stitching in 2012!

Monday, December 19, 2011

Christmas Orders O My!

Usually orders pick up during the holiday season, last minute gifts and the ease of online shopping.  This year seems to have come a little late however.  Thus far in the last two months I've had 4 custom order requests, 5 if I count the few months before.  They've consisted of a scarf, hat, amigurumi bunny, and two sets of armwarmers.  Knit also seems to be more popular this year as 4 of the 5 orders was knitted.  All in all I'm very happy to be having these orders, as well as having various pre-fabricated stock orders too (namely our Tree Frog Trio cross stitch and one of the gabus from our quartets).

With the coming of the end of the year we hope to be finished updating all of our stock, in all our store venues and our official site.  Also after the holidays we'll be taking a week break from projects to get some financial details tended to (namely prepping all of our past paperwork).

Thursday, December 15, 2011

Saucy Mermaid Mitts - Pt 1

With the holiday season, and a new friendship with a talented beader and wire artist, comes  a new custom order.  One of my favorite items to make are a pair of armwarmers.  The original pattern is simple and basic, however I have much altered in and with this particular run through I will even more heavily altering it.  I'm using a seed stitch rather than ribbing and have devised a way to make a custom fit.  Another variance I'm putting on the pattern is for the gusset (where the thumb goes) in line with the rest of the pattern.

Melli has chosen a love blue and green variegated acrylic made by Michaels Loops & Threads Impeccable Worsted - a personal favorite yarn of mine.


The swatch made helps in establishing the proper sizing and for me is very important as I tend to knit very tightly.  (I will also point out that this is a vast improvement over the first squares I knitted which were typically entirely too loose!)


Friday, December 9, 2011

Knitted Mud Track Skull Hat - Pt 3

And finally, the hat is done!  I pretty much stopped using the pattern exactly and glanced at it here and there, as the decreased intercepted the design area.  I also took out about 7 or 8 rows so that hat wouldn't be too big and added an extra step when finishing.  But despite the frustration and long hours of work...it actually looks better than I expected - yay!


This will not be reproduced...

Giant Thread Art Goodness!

Previous to this post is the introductory one, but sure to check it out:  Peruvian Thread Art.

Now for a lovely photo tutorial, without much adieu!

This tutorial is based on what I did for my first piece, therefore it later may be turned into a video (which we'll feature on our YouTube Channel) or updated with more information.  For now this will suffice, so I highly suggest you check out other string art tutorials.  Although I'll try to add any helpful notes at the end and note pitfalls I noticed in my own work.


Gather your materials!


  • 12 g aluminum wire (or any large gauge wire pliable enough to bend into a frame)
  • mold (to wrap & shape large gauge wire, eg. a coffee mug)
  • 22/24 g wire (or some smaller gauge wire of your choice for coiling, we used Fun Wire)
  • wire cutters (to cut wire of course!)
  • US 2 knitting needle (to coil wire, needle should be approximately chosen to suit gauge of frame wire, using a needle gauge to check wire gauge then go up a size)
  • worsted weight cotton yarn (this is just what i used, you may use any weight you like, but I do not suggest anything larger than worsted as the strand will be too bulky; this also will be relative to your frame and coil wire size)

Some additional tools that are optional and helpful but not direly necessary:
  • Round nose pliers (for creating eyelet to hang pendant)
  • Bent nose pliers (for wrapping excess wire)


And now to the directions...


Wrap frame wire around the larger end of your mold.  This will make a circle (use if you like), to make a more teardrop shape as is traditionally seen with this art form move wire to smaller portion of mold and pull gently.  [Important note:  DO NOT coil your ends more than once to hold as you will have to uncoil to get the coiled wire on the frame.  This is a faux pas we noted and made our design process a little tricky as it was necessary to abuse the frame to unkink the wire.]


Hold end of wire parallel to needle and begin wrapping around needle.  We kept our coil wrapped loosely to allow space for the yarn and so that we didn't have to stretch out the coil too much.  [You can see our coils are not precisely evenly space, but this is okay.]


Gently slide coiled wire onto frame wire, making sure to keep spread coils evenly spaced (as much as possible!)  If you have trouble with this you can manipulate the coils some before and during wrapping, but not after.


Starting at the top, wrap yarn from some point in a straight line across frame.  There are a number of ways to do this and your choice will greatly affect how your finished piece looks.  As you see from the finished picture below it would have been better to not start out where we did, but for a first run through.  Experiment with this!  [It's also suggested that you stick to one yarn when using worsted as it's too thick to effectively use more than one, however with a lighter weight yarn or other fiber it may be possible.]

To finish...in my version I did not use any sort of adhesive to affix the thread, but it's highly suggestible to consider this.  Nail polish (clear) works well I have been told.

A final note, I did not measure anything, as I prefer to really eyeball my work as I'm doing it.  So my suggestion is to get a small skein of yarn (50 yards or so is more than enough), and about as much yardage on your wires.  This ensures that you will have enough to make at least one piece, without running out.


Happy Wrapping!

Aradia Goseling
of
Faith Works

Peruvian Thread Art...

So I'm a part of CafeMom and a member of a groups for crafty mama's there (but of course, why wouldn't I be?!)  Recently in this group I made a new friend, a real one even - not the type you friend and seldom talk to but one that I have rather frequent and indepth conversations with :D I <3 U Melli!

She's a lovely artist who makes thread art pendants and such (You can view her wares at her online store Melli's Trinkets on StorEnvy) and at one point we were talking about thread art.  Now I have seen it before and always admired it, but it looked so complicated I couldn't fathom trying it myself.  Finally after pouring over some Googled pictures of phenomenal art (the color choice really can make it *POP*) I look through her Pinterest (to which she had earlier alluded contained a tutorial) and gave it a shot at trying to understand it.  I was most pleasantly surprised to see that it was not as hard as I thought, yet very time consuming (though with a gorgeous end product it's well worth it...)

Of course, ever looking for more fun crafts to do, especially ones that involve fiber I am adding it to my list.  With some modifications.  As I greatly esteem my friend I would not want to "horn in on her business, especially as a novice".  However I feel our talents and imagination differ enough that such will not be the case. As I am largely a yarn artist I intend on making my own string art mega huge...I am as my tattoo artist once called me "a size queen".  (And while I laughed at him at that moment I realize it's all too true.)

What I hope with my own version of this art is to use bigger gauges and make larger pieces, not that I am averse to smaller ones.  I also want to use fibers and shapes that are not typically used.  I will be shortly writing a tutorial for "giant thread art goodness" which I'll share here.

~ Happy Wrapping! ~

Aradia Goseling
of
Faith Works

Sunday, December 4, 2011

December Updates

December is finally here which means the holiday buying season is drawing to a close.  Many people are making last minute purchases, but we'd like to remind you that if your pre-fabricated order hasn't been placed yet that we cannot guarantee that it will arrive by Christmas.  Any custom orders will not be available before the end of the month as well.  But don't let that stop you from buying handmade...


With the end of November both the "Lori Lace Window Scarf" and "Gratitude Shawl for Lissa" were finished and sent off to their respective owners.  Joy was expressed by both which always makes an artist happy!

Our hand stitched cards are still works in progress as we decide how they will each be displayed (we're thinking frame or matting with shrink wrap.  It's also come to light just how labor intensive the entire process is to produce one card too...(this wasn't quite expected.)

Additionally we have a baby shower gift basket in the making as well.  The initial one is a gift, but we'll be offering subsequent ones in "made to order" status only.  This basket will include a hand picked basket (which is pre-made by another vendor but later may be made by us), baby blanket, hat, a stuff toy, and some other goodies we've yet to determine.

So until 2012!  We wish you a Merry Christmas, Happy Hannukah, Merry Kwanzaa, Merry Yule, and otherwise a Happy Winter Season and New Year...!

Knitted Mud Track Skull Hat - Pt 2

As I mentioned in the last post there were bound to be more unforeseen challenges to this order...and I was right.  They came in the form of colorwork and the decisions on techniques used to carry yarn and otherwise hide it on the wrong side of the work without leaving a mass of ends or bulky knots.


Some color has invariably been moved about and of course the stitch type and changing texture adds to the visual element as well.

See the exciting conclusion to the project including finished pictures and comments Knitted Mud Track Skull Hat - Pt 3!

Knitted Mud Track Skull Hat - Pt 1

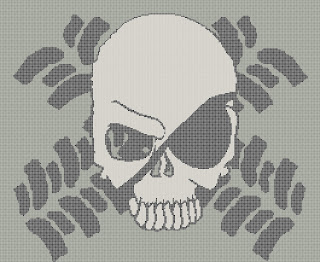
A few weeks ago I received a commission from an acquaintance about a hat.  Of course it couldn't be just any hat, and surely not a simple one, it had to be a 100% custom order.  While I love these, there are always more pitfalls involved than I realize unfortunately and that can be a real pain in the butt.

Initially the order started off shakily as it took more time than I anticipated to work out the details.  Thankfully I have my cross stitch charting program and a nice photoshop program that allowed me to great edit the base image from which the chart would be made.  Of course my eyes were bigger than my stomach as the design I ended up with was a good deal more complicated than I anticipated.

These...


Became this...


Now for those who have used charted designs before you know that what will come of a purely square graph on a small scale will not be such nice pretty line work.  But what resulted is still pretty great I think.


Even so however, the design is merely a guide.  While I tried to adhere some stitches just didn't want to behave...

Be sure to check out "Knitted Mud Track Skull Hat - Pt 2" for more pictures!

Sunday, November 20, 2011

My First Plarn Tote!

When I first heard about plarn I knew I had to try my hand at making some.  So I did...and then it sat on my yarn shelf dismissed for the time being.

From my time selling on Etsy I knew that not only did they offer neat email collections of projects and tips, but also they featured a "How To" section on the blog.  It was there, when browsing spastically one day, that I came across Claire Baker's article on making plarn and then making a tote with it.  I looked it over and bookmarked it for later consideration, my queue already ridiculously overfull.

So I've just now finally gotten around to it, and finished my first tote just today.  It probably took no more than five hours (not including the time to make the plarn, which is a rather laborious task I might add).  For the first go round it's "interesting".  I don't really know what else to say about it, or for that matter what to do with it.  My initial version was to get familiar with working with plarn and the pattern for later improvisation and as I finished I knew that I had different taste in handles, would incorporate color and perhaps a different stitch pattern.  But for a first round it's not too shabby, or rather is shabby shic. :)


Saturday, November 5, 2011

November Updates

Winter is nearly upon us and with that comes the crafting of more cozy items.  We have several throws & blankets in the store eager for new homes, as well as some very nice thick scarves with matching hats too!

Our queue is still sporting the two items on it from last month, as both are expansive knits:


  • Lori's Lace Window Scarf (which is about at the halfway point and currently getting 2 hours applied to it)

  • a Gratitude Shawl (also very close to finished)
After each of these is finished we'll be taking a break from or regular queue to work on some gifts for one in need.  We have a dear friend from our college days who is due at the end of November so we'll be making a nice baby shower basket including a blanket and hat for the little one, and a shawl for nursing or just to wrap up in - we also hope to make some neat soft toys for the little one when he is older, a stuffed animal, and perhaps a mobile, and a custom-made diaper bag...


Also up and coming is a hand stitched card line that we're featuring as personal gifts with some of the designs being made available in our store for the coming year!

Wishing you a Happy Thanksgiving!

Monday, October 10, 2011

October (& Belated September) Updates!

Somehow I managed to completely miss doing my Kalends (first of the month) post for September and am rather tardy for October as well...I can honestly say that I don't even know where the time has gone.  For the last few weeks it's been swallowed up by insomnia and a sick child however.

In the time that I've been away however several changes have been made.  All of the years (into 2012) coupons have been made for the store on Artfire, including a 30% off one for each month that has a sabbat in it.  Some of our other revamps haven't made it public yet (like adding more product) but they are scheduled for this month as the holiday season draws nigh!

Our current WIPs include:

  • Lori's "Lace Window Scarf"
  • a "Gratitude Shawl" for a friend (it's a secret to whom it's being made for so we won't name them here)
You'll notice that this is less than our usual 3 a day but recently we cinched up the production on another gift - "Good Luck Bear - Carebear Rug" until more supplies are purchased (the binding & backing), the same with our "Nicole Striped Hat" which we underestimated the yardage needed somehow. o.O  With the freeing up of additional time the extra hour will likely be devoted to our commissioned piece as we had to take a week off from production.

Some of our pricing is undergoing a revamp as we've re-worked our formula.  Rather than have a "base price" (profit we'll make) we're negating that and tallying an hourly wage which in some cases may change our pricing.  However, as an artist this is more fair to us given the amount of work we've put in.  To be reasonable we've instituted a sliding scale with brackets for different amounts of hours so that none of our prices are outrageous (this is especially beneficial to the customer for labor intensive pieces like cross stitch).

Two commissions have been accepted, though there is a new rule being instituted of us only working on 1 custom ordered piece at a time, with the other two project hours being devoted to pieces already in our queue.  As custom orders are very labor intensive not only in the production arena, but also in the design process taking on one to work on at a time seemed more time efficient.  While we will never turn down a custom order customers are made aware of our time constraints when the order is accepted.

Thanks for stopping by, see you in November!

And don't forget to visit the store, we currently have a 30% off coupon for October - use code "S4MH4IN" at check out!

Friday, September 23, 2011

2011 Holiday Message for Buyers


With the coming of Winter just around the corner (seriously it's only about 2 months away) it's time to get to that last minute shopping.  While it's normal for people to shop a bit more in the latter part of the year it cause us a little off guard and there was a bit of a scramble.  To remedy this we're instituting a few parameters to guide along your holiday shopping experience.

The first important point is that we will not accept custom orders beyond November 15, that gives a generous month to complete and ship any orders.

Continuing on that vein, while the store will not be closed during any holiday we will cut off holiday shipping on: Dec 15 for orders in th US and Dec 1 for international orders.  Both of these dates allow us a few extra days to get to the post office or have packages picked up.  Any orders placed after these dates will be accepted but we will not guarantee that your items will reach you by Dec 25.

Our final goal for this year is to have our stock "bulked up" by November 1.  Anything we can or have been planning on making multiples of will be available then.

Looking forward to a fruitful holiday season with you!

Aradia
of
Faith Works

Tuesday, September 20, 2011

The Value of Handmade...

Recently it came to my attention that I needed to really re-work my business model.  As you may have noticed I've been a bit in a flutter about this lately as ideas and inspiration are pouring into my psyche about how to get to where I wish to be.

In this issue coming up I received a bit of a "rude awakening" at how I was putting myself in a hole when dealing with a custom order recently.  The long and short of it is that the consumer wanted to pay half of my quote.  This figure only just covered materials costs and some hidden fees I as a seller have to pay.  The remaining amount didn't cover the skill or effort I'd put forth thus far by a long shot, but as I had given the estimate prior to re-working my pricing formula I wasn't about to go back on it now.

The nitty gritty behind the issue is that I am an artist & crafter dealing with a non-artist.  Now I've had this issue before, even when dealing with another artist.  In general people don't understand art or what they're asking and paying for.  When the average person goes to work it's for 8 hours and aside from management or anything complex it's a so-so level of effort or skill involved.  (And please don't think I'm downgrading anyone's work.)  But to be frank, going into the office to type things up, file, deal with customers, or anything remotely clerical doesn't involve a lot of hard skill.  It doesn't require you to go to school to do, you learn mostly on the job.  For those things where education or extensive training is required most of the time you learn what you need to and that's it.  You then go to work and apply this knowledge.  Innovations while they are present aren't such that it's necessarily a norm in non-art industries.

When I work for 8 hours I can easily get a nominal portion done.  This in part is due to the nature of my particular work.  Fiber arts are notorious for taking a lot of time to be done handmade.  And while some of them, like weaving and knitting, may be done via machinery things like crochet and cross stitch/needlepoint cannot.

Another factor of the problem is trying to compare output of handmade versus machine made.  A person's hands in nearly all cases just cannot keep up with a mechanized version.  They are literally two different animals and comparing them is a moot point.  But while you get speed and efficiency as well as consistency of product every time for mechanized work you cannot get the human element.  (Thankfully!)  When  you go to Target they have shelves and racks full of garments.  Garments that likely took a machine less than an 8 hour workday to make, which would take a person several weeks depending.  When you shop handmade you'll likely find one or two of a single type of item and often in a wider range of colors or styles versus a huge stock of green sweaters.  However, one of the big differences between the two is you're unlikely to find anything handmade in a major store.  Where you could find something made by a simple machine in a handmade store.

This is perhaps a good and bad thing.  While it lends uniqueness to the work it also adds scarcity (ever wonder why handmade items cost so much?)  This on top of other factors like wage (based on skill, experience, and time) factored in make a big difference in cost.  Also consider that your typical artist, even when in business for themselves is typically a small business.  Not equipped to mass produce anything complicated.  They also may or may not be able to get anything wholesale in the way of supplies or may be limited by other factors (like space).

So when you go to Target, Walmart, or wherever next time and you see that cute sweater for 20.00 realize the actual value of it.

Time To Get Serious...

I recently had a loved one tell me that my business was nothing more than an aggrandized hobby.  Not his exact words but he was looking at it from a purely financial perspective.

At first I balked at this appraisal.  I was shocked, and frankly offended that he would say that to me, especially about something I loved so much...but after staying up late into the night last night and doing a bunch of reading courtesy Etsy's Blog I realize it was in fact true.  Much to my chagrin.

I'm a reasonably intelligent individual, so why am I having such trouble.  A look at my old pricing model and the new one I'm developing as well as an analysis of the effort (and where it's been going) I have put into my business tells me why.  For one I was severely underpricing myself, not charging labor, and cutting deals where I (from a financial perspective alone) shouldn't have.  Two I was cheapening my work by doing this, making the expectations of customers low.  And I spend hours upon hours in the creative process and virtually no time on the actual business aspect of it.  So I'm doing a double disservice, to myself and to my customers.  While my work and effort are both of good quality there are many kinks and hiccups that could be otherwise avoided were I to "put my money where my mouth is" and buckle down across the board rather than focusing and bottlenecking my efforts.  Surely if I spent several hours on my business aspect I would be making a good deal more and at the very least would have that part "taken care of" rather than the apparent shambles it's in now.

So I've opted to spend a week going through Etsy's "Seller's Handbook" tackling each applicable major topic, reading through their offerings, doing my own research and correcting (at least beginning to correct) the problems.

Here's to financial abundance and overall success!

Valuing Your (My) Work as an Artist/Business

This post is not out of desperation, but rather explanation...

As you'll soon note and if you had noticed from my prior post major changes are happening here at Faith Works.  Having read through about eight or nine articles concerning pricing (thank you Etsy.com) I decided it was time to put that resource to good use.  Even when I was selling on Etsy I rarely went through their blog, despite it being chockful of good pointers from the staff and myriads of sellers.  But having recently re-thought where I stood with my business endeavors I decided it was more than high time.

First beast to tackle...pricing.  Like some dread ornery dragon pricing one's work can be super difficult for an artist.  If you have read through articles this point is usually touched on, as is that of most artists underpricing themselves.  Now yes I bring it up here but I also go into some of the important points that are part of the reasonings behind these issues that don't necessarily get covered.  Sure as an artist I underprice myself...but why.  Obviously the only way to fix it is to get to the source otherwise I'll continue whatever habit is causing it.

I think for me the biggest issues is the way in which I, and many other artists, think about their work.  Knitting for example.  It's been around quite some time, lots of people in lots of countries do it.  With the plethora of information available between libraries and the internet both via written texts, pictures, and YouTube videos it's easy enough to learn.  Just get a stranded fiber (it doesn't even have to be yarn) and two knitting needles (or pencils, pens, chopsticks even) and go to town.  For the knitter, you know how to do it so it doesn't seem like that big a deal.  It's not that hard frankly.  But you can't simply look at your artform from the perspective of someone who knows how to do it...to quote one of the articles ' "You are not always your target market." '  After all, chances are if you can do it you would rather than paying someone else to do it.  Sure this doesn't promise that you wouldn't as a knitter buy someone else's knitting.  Maybe you really like that sweater or shawl or cardigan and don't have the patience, skill, time, or resources to make it yourself.  Or perhaps you just would like to support them and don't mind buying it simply because it's easier.  Regardless, if you have a decent amount of experience in knitting you know how long it takes to do a large piece like that cardigan by hand.

The other portion of it comes from considering that that garment in the store was likely mass produced, likely by some machine or at the very least for ridiculous cheap labor.  Chances are the person who makes the sweater you see hanging on the rack didn't do it strictly by hand or from scratch.  The fiber was made synthetically, machine processed into fiber, which was put through another machine to make the fabric, and possibly a final one to sew.  What could add up to 80 actual man hours with the use of machines and assembly line processing takes a fractional amount of that time.  So of course that sweater is only 20.00-25.00, that had you made it start to finish could have realistically cost twice that.  Mind you even many handmade crafters don't tend the sheep, sheer, spin, knit and then sew every thing they make, it's still a good deal more work than what a machine can do.  So in essence you really can't compare the amount of work put forth between the two.

So it comes down to the fact that I, as an artist & crafter, get paid for what you don't/won't/can't do.  There's nothing wrong with this, there are plenty of things that the average person doesn't do or knows little about and the purpose of any training or education allows someone to do it.  So as long as it gets done by someone yourself or someone else it's fine.

In general my items are not for the faint of wallet or quick fixers.  Walmart and Target serve those needs.  I make fine quality, heart felt gifts be they for yourself or someone else.  When you buy from me you get an experience, not just a product.

Major Re-Vamps...

The story I'm about to tell is a rather detailed and gets farther into the mind of the artist than you may be expecting.  But part of the allure of dealing with an artist is that they are in fact a person.  With hopes and dreams, trials and tribulations - the spice of life...

Since the birth of my son life has slowed down a bit, in all areas.  My production, including filling an existing order and taking on new ones has slowed to an extreme crawl it seems but for good reason.  If you're a parent, especially a SAHM (stay at home mom) you know why.  Kids are a handful at any age, but newborns even more so.  No sooner are they tended to than it seems you are tending to them again.  And that is with them healthy.  But I'm coming back, slowly but surely.

My time away has served a dual purpose though.  Sure it's allowed me to adjust to this new small person around me, it's also put life into perspective and work.  During my pregnancy I have had a very hard time working.  The only work I've managed to be able to muster the strength to do is that which deals with my art and healing center.  And even the work done there has been so so.  Normally a super industrious person (note the late hour of this posting) coupled with my insomnia makes me super productive at times.  For my very Type A (at times) personality that is quite attractive.  My eyes glaze over and I drool hungrily at the prospect of getting even more done in a day.  It has also allowed me to do some much needed reflecting and brainstorming.  Both of which I had put off severely and to my own detriment now that I look at it.

While my store has been in existence since January of 2009 nearly all of my efforts have been focused at the creative aspect of it.  From innovating designs, creating them, and spending time describing and photographing. Don't get me wrong, there has been a business element worked on, including noting inventory, pricing, and what not.  But not nearly as much as I should have been.  Most notably the financial aspect of my business is more than a bit lacking.  I have severely underpriced myself and just not taken certain things into account that if I were working elsewhere would be noted.  I straddle halfway between hobby and business.  Working creatively as much as business, yet financially as much as a hobby.  I have neither taken note of the amount of time I put forth into anything.  Or considered what I ought to be paid hourly or my overhead (which thankfully is very little at this point).  And now I see how I have put myself in a hole over it.

So many changes are going to happen, pricing is being reworked, and I plan to make use of more of my resources (such as the blog option on Artfire), coupons, sales, featured items, and some updating of policies as well as the addition of some new products.

Wednesday, September 7, 2011

Coming together?

I reserve this blog specifically for things about the business, but nothing overtly personal.  It's not a matter of not being the full me all the time so much as a desire to compartmentalize.  If you're interested in my personal thoughts as an artist I have a blog just for that, which at times includes rants even...

It's true, while I don't really want to admit it, that I haven't invested as much time or effort into growing this business - or it's sister company.  While my products and services are good, great even marketing and putting myself out there just isn't my forte.  This occurred to me as part of the reason for the mediocrity of my success. Sure I sell things, sure people like what I sell, or my work, but how many people (who know me personally) even know what I do?  Sure the few who know me exceedingly well and talk to me often have likely heard me talk about it or even been on the phone/messenger with me while I've been working on something.  But I know a lot more than just those and honestly for the sake of getting my name out there it should be one of the most commonly known things about me shouldn't it?  Yes.

In that light I have noticed that a lot of things seem to be coming through lately.  While I can't say that the decision to focus more on the business aspect, rather than just the creative, of my business has landed me this sudden influx of consumers other types of things have been coming through.  Such as this article about using one's blog to get business.  There have been a handful of other things, such as new contacts via Facebook and LinkedIn, new followers on Twitter and with Google+, and likes to my pages and website.  All "baby steps" in the grand scheme of getting out there and reigning in success.

So do you have any tips?  What's worked for you?  Looking forward to hearing from you and thanks for tuning in! :D

Sunday, August 7, 2011

August Updates!

I'm a bit late as this should have been done last month and for this month a week earlier but having a baby has decreased the amount of time to "spare" we have available by a drastically large amount and much more than I had anticipated.  However, I'm getting back into the swing of things and have caught up on a number of things and will be finishing several things up this month *fingers crossed*.  Throughout July I was unable to get much of anything done project or business-wise unfortunately.

Some new improvements to Artfire's site have allowed us to make coupons and to help celebrate that and our holiday this month we'll be taking 30% off all our throws for the month of August.  We also will need to visually revamp the site and some of the layout and outlook as several viewing options have changed, some positive, others not so much (IMHO).

In our queue we have a number of projects but first and foremost is a back order for a pair of armwarmers.  After that we have a few "charity" projects (a gratitude shawl for a mentor, a plastic bag holder for a roommate, a rug for my sister).  What's left over are things that were already present and really it's all a matter of what we'd like to work on first and what we can work on.

Only a few months ago we had implemented a new schedule which has been so far serving us.  While four hours just doesn't seem like a lot of time the steady work on a few projects has given us headway.

For the remainder of the month our goals are just to keep plugging away marking things off our queue and bring back some old items we haven't offered in awhile (like our bath salts) and perhaps bring some new herbal products in...

Sunday, May 1, 2011

May Updates!

It's that time again...the first of the month calls for a brief recap of the previous month's goals and an overview of what is coming up this month!

Near the end of the month we started some armwarmers that had been on our queue for awhile for lack of having the proper sized needles to start.  Lo and behold we got them done and whipped them up in a few days.  It was definitely a learning experience as most of our knitting in the round has been composed of hats with bulky yarn.  Working the smaller needles (size 7 versus a size 13) was interesting.  Then to our surprise (and thanks to Facebook) we sold those armwarmers before they were even finished!  (And we had been doubting the possibility of that due to the hideously bright color they were...)

We also had something to say on our thoughts about being green as an artist/business.

Our Artfire posting goals have waxed and waned, some days we've met the quota others we haven't.  But with about half of our stock listed we can't complain really.  Stocking that store has also allowed up to revamp some of our descriptions of things and save them (we lost them all from previous listings) and we've placed them on our store's official site (which you can also order off of).

As for our queue....In an effort to better organize and use our time wisely (as the business owner also runs another separate business with it's own store among other things) we've been following some advice from Flylady about working from home.  We revamped our project list which at this point is upwards of 70 projects (with a few marked off...):


However, with each one we mark off it seems another 5 or 10 jump right on (that's okay though, we like to keep busy!)  But what's currently underway and what you can look to for updates on our Facebook page and in our photo albums are these:


  • Nicole L's Scarf
  • Nicole L's Hat
  • Hellenic Reconstructionist Altar Cloth
Yea we know it doesn't look like much, but we also only have 7 hours to do any work a day (and only 4 of those are allotted to this business) and generally our project work is 1 hr/day/project (otherwise we'd overdo it!)  There are also a number of other projects - which we won't mention here - that are done not for profit or in trade for something else - you can note those on our blog that explores the scenes behind the art with the artist.


Perhaps most importantly that happened in April was the new institution of a work/personal calendar for the artist.  While we are the industrious type we tend to get bogged down by a lot of projects, eg distracted, and sometimes will only work "willy nilly" on things.  While this isn't atypical of artists, it's annoying to get virtually nothing done and really a pain in the butt with the level of productivity we'd like to accomplish (we're literally doing something from 6 am to midnight 7 days a week!)  So far the schedule, while it looks ridiculously monstrous and daunting, is doing a good job of keeping us on task.  We can't say for sure or not if it's making the artist's insomnia worse but there is definitely more structure in our day!

So what's in store for May???  Working on a few projects, keeping up with our new schedule, and many orders we hope!  We're glad you stopped by to see what we were up to and look forward to making your acquaintance!

And as a special gift to all who actually read our blog, we have a major holiday this month, we're offering a 15% off coupon on your entire order if you place it in May!  Use coupon code - B3LTAN3 - in your message to the store when you place your order!

Monday, April 25, 2011

Super Bright Orange Armwarmers...Pt 2

Running into a slight problem...Running out of this colorway.  Want to make two of the same kind so figured out how much half of what I started out with and am making sure to stop short of or at that amount.  Basically this leaves the end ribbing left.  So while not a failure, wasn't quite what I thought it was going to be.  The thickness of the yarn also makes the armwarmer on my arm huge (and I have tiny arms!)  This isn't something that's not happened before with this pattern, as other people have had this issue, but I think this is even worse for the fact that it's a heavy worsted.

The other issue is WHAT color to choose to finish off the end of the armwarmer?  The only other thing I've used this color for was my "Toxic Waste Apple" and I used white with that and I'm kind of inclined to do that with this one as well...then again I already have interest in this piece and I want to make sure they get sold.......time to consult the consumer....


Color Choices:


From Left to Right:  White, Red (it is a True Red in regular light), Navy Blue, Bright Green, Burgundy

Let us know what you think as far as a color suggestion!

Sunday, April 24, 2011

Thoughts From the Artist - Being Green

Recently we read an article written by the lovely Monica Wilcox about being green.  While a lot of it "trined" with us, it brought up many things that we hadn't even thought of (which is always good!)  We're currently about to start packaging up another order for the store and a thought occurred to us that we felt we should share!

If you don't already, try to work towards making you business green!  There are several simple ways to do this and it is rewarding for both you and your consumers.  (Also don't forget to share ways to be green with them too when you package things!)

As a handmade artist you may be already being green with your works - recycling old sweaters for yarn, recycling or upcycling things (like this artist and stripper shoes!), or even just being green-er by supporting local artists and businesses yourself (buying supplies, bartering time or services, etc).  But there's more to it than just that (although we're not knocking it and encourage you to keep up the good work!)

One easy way to be green is through your packaging!  Sure it may be nice to buy that pretty new, never used, decorated box.  But think about it this way.  That box was created, time and energy were spent that can't be retrieved to create that box.  Sure it's nice to look at, but ultimately what is likely to happen to that box after it gets sent?  Trashed.  Not recycled, not reused, it's just most likely to be turned into trash.  Trash that we don't need any more of.  So instead of doing that, try to re-use a box.  Do you have an old shoebox that will work?  If you don't have any lying about (likely because you threw them away or are using them) try this.  Go to a local grocery story, liquor store, or other retailer - like Michaels (and we can give you this tip having worked there before!) and ask if you can have some boxes.  It's worth a shot.  A number of the boxes that we have on hand for our store come from Michaels and we're not even half way through them.  Granted if you don't sell a lot or have limited space (like we do) you may not wish to grab a ton.  But even a few is helpful.  Because many stores are only going to trash them and throw them out.  Not even recycle themselves!

So now that you have a box, thinking about what else you need.  If it's fragile, or just don't fill the box completely (and rarely does anything it seems) you will likely need packaging materials.  Instead of that fancy tissue paper that you use half of try old newspapers.  You don't even have to buy it - you can grab some of the free ones that are usually for local stuff.  Then there is the wrapping you may have received for anything you've bought.  And don't forget....plastic bags - you know the kind your groceries come in.  For us around here (and much to the chagrin of my other half) I'm always saving things like newspaper and plastic bags.  But in this tight economy and with the advent of everything humanity has done to poison the planet reuse and recycling is a really good (and economic) way to help out.

So next time you're in the post office noting people purchasing fancy boxes and rolls of bubble wrap you can smile to yourself knowing that even if it's only one package every so often, you're helping!

Monday, April 18, 2011

Super Bright Orange Armwarmers...Pt 1

Some time ago I came across a neat pattern (finally) for a set of ribbed armwarmers.  As anyone should know if you go looking through patterns there are a number of different styles but many are rather fanciful and sometimes just plain overly decorative.  Being the utilitarian sort of person that I am I try to go for things that are a bit more simple and then do my own improvisation later rather than something heavily improvised to begin with.

While I was ecstatic when I found them I was disappointed that I couldn't immediately start on them (as I didn't have the necessary size or type of needles I needed.)  Lo and behold a few weeks ago I finally ordered a set, fifteen different sized DPNs from 0s to 15s to be exact, and have only just now remembered my pattern findings.

As it stands I have a decent amount of worsted weight yarn (what the pattern suggests) but nothing I quite wanted to part with for this particular project, so I opted to use some hideous yarn I inherited from someone cleaning out their home.  A very bright neon (like the color hunters wear) orange.  Thus far the pattern seems to be working well enough, which is good.  Though further research of other people's success with it is so so.  (There are a number of complaints about how the thumb is made and how it produces a holier look than is likely intended.)

But so far so good as it were, eyesoreness aside.


One of the benefits of this pattern is that it's constructed in the round (a preference of mine).  Working in the round generally limits the amounts of seams made and to me gives the project a more cohesive look.  On the other hand if you fudge something it's not as easy to hide...

Saturday, April 2, 2011

April Updates!

A day late, a dollar short...while this update was supposed to have gone out yesterday that day was filled with a little too much frustration and errand running, so today is the day and we'll just pretend...

Throughout March we've accepted a number of "new orders" most of them custom.  Some have been all out, "this is what I want, in this color, size, etc" while others have just been ideas being tossed around and notes drawn out.

We also brought Faith Works back to Artfire.com, but our goal of 5 new items & 1 gallery item has been slow going so we're not as up to date with all our stock as we'd like to be but it's getting there!

A quick view of all of the projects we've got in our queue (being currently worked on):

  • Nicole L's Scarf
  • Nicole L's Hat
  • Autumn Evening Hat
  • Sweet Lil Goth Hat
  • Scrap Granny Square Afghan
  • Plastic Bag Holder (for Lori)
  • "Reiki Awakening" Logo for Alice
  • Reiki Principles for Nicole
  • Carebear Rug for Sarah
  • Placemats
  • Belts
  • Ugly Plaid Dog Pillow
  • GaBus
  • Butterfly Mosaic Shawl
  • Double Pocket Knitting Needle Case
  • KAL with Derby (the Hacky Sack Hoodie)
  • Shirt for Krystal
  • *Hoodie for Joni

As you can see it's a good number of projects going on and almost all of them are "long term" (meaning they'll need many, many hours put into them to finish or make headway.  And of course as always we're generally always accepting new orders, we just move things around in our queue.

So here's to April, accepting new orders, finishing previous ones, placing more in our new storefront and lots and lots of sales!

Till May :D

Wednesday, March 30, 2011

Hellenic Reconstructionist Altar Cloth - Part 4

For those who've been following this I know it's been awhile since I've put anything out about it.  Technical difficulties have greatly inhibited progress and Murphy's Law seems to have been rampant through this process as I'm sure you've ascertained.  The biggest update so far is a determination that estimating size with the Jacquard technique in Tunisian is problematic and far from exact.  So we're settling on design elements more and exact dimensions less.  I know that with the dimensions estimated that the cloth will be greater (thus far in width) than the estimated original dimensions so it's not too small which is good - so it serves it's purpose if not altogether how it was originally conceived.

Funny how art has a mind of it's own...much like a living being it becomes what it will become your plants be damned!

Saturday, March 19, 2011

Organization @ the Workplace (eg Home)

If you didn't know I work from home.  This lends itself to certain pros and cons.  Working for myself means I can go to work whenever I want.  I can take off days or weeks at a time, have long lunches and my level of productivity is solely derived from myself and my setting of deadlines.

However, as any of you who work for themselves know it's not all cake and pie.  When I'm commissioned, I'm technically working for the commissioner, thereby being judged and otherwise evaluated by them.  So I'm my own boss most of the time, until that comes up.  This for me is quite fine as I am very detail oriented and strive to  please my customers as best I can and being so exacting I can wheedle out any serious issues before even beginning a project.

I happen to be a harsh taskmaster though and my levels of expectation when it comes to productivity are nearly (if not completely) astronomical.  I expect to work more than 16 hours in a day and get "everything" done every day.  Honestly that is quite impossible if you factor in breaks, meals, sleep, and the fact that even just looking at the "work" portion of my day I pile entirely too much in for a 24 hour period.  I have often joked that I need to find a way to add another 16 hours to my day...

Despite my desire for insane levels of productivity I happen to be quite terrible at managing my time.  This may strike you as odd, but really it does make sense.  Many of my artistic conquests take innumberably amounts of time to get things done.  Fiber arts especially being almost 100% always handmade (at least in my case) take hours upon hours to make progress on.  While I'm not complaining by any means as I adore many of these crafts it can be inconvenient to have several to do which would eat up 90% of the hours of the day to make any "real" progress on...*sigh*

So finally, after much frustration and some floundering I'm attempting to instill not just a home routine (which has helped immensely) but also a work routine.  And yes ladies & gents, limits too even.

Friday, March 18, 2011

New DPN Case!


Having fixed my sewing machine issues (see post before this one) and receiving my set of 15 DPN (double pointed needles) in the mail today I opted to make another case for my lovely new tools! While retail stores have them and they are quite nice, the sheer amount of hooks & needles I have is such that I'd have spent a fortune in cases!

Having collected and kept fabric from my quilting grandmother and mother and hoarding it as well as random other sewing materials over the years I opted to make my own.

Mind you having found a simple tutorial in a crochet book about it didn't hurt for basic instructions.

Of course if you visited our blog before you've seen our hook case we made (entirely by hand *shudder*) for our other half and you'll likely notice the "uniqueness" of the design (honestly kind of hideous). As you can note from the pictures of this one it's not much better in the color scheme but it definitely has character...

More to come later! :D


Sewing Machine Issues - Funny

So I have been struggling with my sewing machine for months. I've read back and forth through the booklet desperately trying to find out why it was malfunctioning...

Now I will admit I am not the best seamstress and quite honestly don't even consider myself any good - novice at best. But I do understand very basic things and yet I was completely stumped as to what was going on with my machine. It was working, everything was fine, then all the sudden it started snapping the thread, or it slipped out of the needle. As you can imagine I was quite frustrated.

I adjusted the tension, messed with the bobbin and top thread, even re-threaded the entire machine. I consulted my sewing goddess for her help and went through her suggestions as well as double checking everything from the manual (not noticing any improvement), and consulting the internet. There were several "main" suggestions that usually yielded this issue: bad thread, tension being wrong, needle being the wrong size, wrong type of thread. After that it got repetitive, till I noted a suggestion that the needle itself could have been faulty and a defect may have been cutting the thread. I noted another point, making sure the needle was properly installed in the machine but I disregarded that.

It's always the last thing you check (because even if it was the first thing you checked you'd have found it thereby making it also the last thing as well).

I tell you what having exhausted my brain, putting my machine away, being concerned about having to entirely replace it, etc and so on...

I went to check the needle for any imperfections and lo & behold...it was in backwards. Yes that's right I had installed my new needle (having broken the last one) backwards. How silly is that? All this trouble - even me going to the extent where I went out and bought new thread and nothing was wrong aside from me doing something backwards!

Thursday, March 17, 2011

Bartering! (Shirt VS Bag)

Recently I tasked my Sewing Goddess to make me a messenger bag. It's a case of, I would do it myself, but not really and well I love her work so much I'd much rather her do it! So being that we are both artists I offered a trade of one crafted piece for another and asked her what she wanted.

*dramatic pause*

A shirt...

I could have been daunted, as I've never made an actual "garment" (eg something you put on rather than an accessory), but I find the challenge interesting...

Being the pattern hoarder that I am (I will keep a copy of any pattern that seems even remotely interesting to me in design whether I have immediate plans for it or not) I had a number of "shirts" that could be made, all of them crocheted. I let her choose and that was an adventure in itself because I had at least 20 to choose from. She finally settled on this cute little crop top halter with a beaded fringe (although the beads are hard to see in the picture I sent).

Then came the hard part...choosing a color. After slaving away trying to find the yarn that the written pattern copy I'd seen called for and failing, I finally found something similar. However being the exacting type of artist, or rather artisan, I am I wanted to see the actual yarn used. Knowing from past experiences that substituting could be fun, but also "dangerous" to one's piece I figured for my first foray I would play it safe. I finally find it, again thanks to the internet and am appalled at the boring and otherwise *ew* colors. Almost all pastels and a few bright shades and totally about 15 choices. EW! I showed them to her, she chose one, but despite it being her choice from what I'd asked her about what color she wanted it didn't seem to fit. Consulting a foreign LYS to me I found another option (as well as a slew on Ravelry that "might" work because they were similar fiber & weight) I come across the lovely "Butterfly" by Kertzer. That's all fine and good if it weren't for the 12.50 + tax/skein price. (I wanted to keep our price ranges similar, so that neither of us was "breaking the bank".) I relented and decided to go with her choice of the original, but had yet to click the "buy now"...I wanted to try one more option - my own favorite LYS, The Yarn Lounge....

Going there yesterday for a day of yarning and what ended up being a "car picnic" I chanced to ask Melanie about substituting, giving her the weight, gauge, and fiber content. While there was no Egyptian Cotton, there was a lovely Peruvian Pima cotton and with much better shade selections - including a gorgeous dark blue called Caneel Bay. I was in love and knew that this should be what I used for her shirt and it wasn't so costly as to make it not worthwhile, even with having to buy 5 skeins instead of 3...

So we're excited to have started this shirt after doing a partial gauge swatch (we really do hate swatches and rebel at doing entire ones). The color is lovely and better suited we think to the person it's for, and it's also lovely to work with!

You can check out our piece on Facebook here. Feel free to friend us & "Like" the store! And if you see anything you like we take commissions! :D

Happy Crafting,
Aradia

Monday, March 7, 2011

Hellenic Reconstructionist Altar Cloth - Part 3

Late last night having finished all of the calculations for size and an initial pricing estimate I am all ready to start on this project when I suddenly realize that there is no way that I could do it without altering my original chart (which didn't fit the exact dimensions of what I was working on but now that fact becomes integral to maintaining a certain finished size...)

So I opt to place my chart to the exact amount of stitches across and rows, and even saved the colors in an approximation. I finished it up, exported a JPG and all was right in the world.


I wake this morning, discussing the piece with a friend and show her the remade chart. She comments on how pretty it is and I think to myself that I ought to try something texturally to give definition to the border. Because visually speaking for as "pretty" as it may be to someone who can see that does no good for someone who is blind (which is the case of whom this piece is intended for).

So began several small swatch attempts at different rubbing in Tunisian, none of which really came out "right". Were I to be using regular crochet I could easily satisfy this issues by working in the front or back loop in single crochet or front and back post stitches in double crochet - or even just using front posts and regular double crochet. While I considered changing my pattern for a second I knew that it would defeat the purpose of a "perfect grid" which works great with Tunisian but is imperfect with regular crochet due to the shape of individual stitches. Alas...

*ooo light bulb* One more thought has now suddenly occurred to me of mixing the two techniques...I'll be back momentarily to let you know how it goes...

Back *sigh* first attempt did not work, and a last minute idea while it "works" doesn't yield the effect I'm going for. So for the sake of my sanity and getting this project done I am relenting. Perhaps something smaller at a later date...

Sunday, March 6, 2011

Hellenic Reconstructionist Altar Cloth - Part 2

An update on our piece, finally I was able to get the initial yarn for the project to work up my swatch and see how much I will need and note the amount of stitches and rows the pieces will be across.

My original dimensions were 21" x 28", but to accommodate the border (which only adds a small amount but what I added I still wanted to fit in with the "divisible by 7" element in the pieces) I've changed it to 28" x 35".

I originally tried to estimate my gauge from an inch swatch, just to get a general idea, but I've noted that it's not as exact as I'd've hoped and the math doesn't match (which means the edging which isn't really a stitch threw it off).

While at the store I looked through the reds - there was True Red & Tomato - and decided to stay with the original choice of Tomato, though in real light it is much more a shade of rust than a red red. Seeing the muted tone of that color I opted to go with Thistle as the choice for the other color, I wanted something of a similar value, so as not to overpower the piece with the accent color.

I will be taking progress pictures, including an initial picture of the supplies & gauge swatch (which will be frogged after it's weighed so I can use all that I have to start with) on the store's Facebook page and my personal Ravelry page.

This piece is turning out to be much more involved than I originally thought it would. I'm not math expert and it truly was a struggle at first to make sure that the math fit the dimensions I wanted. Generally when following a pattern tweaking things isn't hard, but when you're not sure and you don't know your own gauge (as I didn't because I've never worked with this yarn before) it's hard to estimate without an actual sample in front of you!

Stay tuned for more updates!

Sunday, February 27, 2011

Lace Panel


I've been working on a self-made lace pattern exploring the difference between right and left slanting decreases and how they affect the look of a pattern. I worked 34 rows before I bound it off after deciding that continuing with a color change was not what I wanted to do. (I tried it for 7 rows and it didn't "look" right, not to mention the fact that the yarn didn't appear to be the same weight as the original.)

I'm unsure what to call the pattern as I'm not sure what exactly it looks like, almost like a strange vine on lattice work. Suggestions welcome!

Contributors