Friday, December 30, 2011

Final Order of 2011!

As 2011 draws to a close I finish our final custom order (and right on time too!)  The unsurprisingly popular armwarmers we've taken to making are finally done, but not without some troubleshooting.  The original pattern, by Coty Cockrell, features a differently stitched gusset (which we changed in this version to match the 1x1 ribbing of the rest of the body of the armwarmer) and is "generically" sized.  We've figured out a custom sizing system which is working quite well.

The other changes I had hoped to make - including creating it in Seed Stitch - did not quite work.  The drawing up of the ribbing cinched the size to a more fitted constituency (hence why your socks generally have a ribbed pattern on the cuff), Seed Stitch does not do this, leaving the fabric flat and unstretched...and decidedly longer when cast on at the same amount.  After started twice and frogging twice it was decided that this order (which had a definite finite deadline) was not the time to experiment.  Though we hope to in the future...


The variegated yarn also made for a fun odd diagonal stripe pattern!


Happy Stitching in 2012!

Monday, December 19, 2011

Christmas Orders O My!

Usually orders pick up during the holiday season, last minute gifts and the ease of online shopping.  This year seems to have come a little late however.  Thus far in the last two months I've had 4 custom order requests, 5 if I count the few months before.  They've consisted of a scarf, hat, amigurumi bunny, and two sets of armwarmers.  Knit also seems to be more popular this year as 4 of the 5 orders was knitted.  All in all I'm very happy to be having these orders, as well as having various pre-fabricated stock orders too (namely our Tree Frog Trio cross stitch and one of the gabus from our quartets).

With the coming of the end of the year we hope to be finished updating all of our stock, in all our store venues and our official site.  Also after the holidays we'll be taking a week break from projects to get some financial details tended to (namely prepping all of our past paperwork).

Thursday, December 15, 2011

Saucy Mermaid Mitts - Pt 1

With the holiday season, and a new friendship with a talented beader and wire artist, comes  a new custom order.  One of my favorite items to make are a pair of armwarmers.  The original pattern is simple and basic, however I have much altered in and with this particular run through I will even more heavily altering it.  I'm using a seed stitch rather than ribbing and have devised a way to make a custom fit.  Another variance I'm putting on the pattern is for the gusset (where the thumb goes) in line with the rest of the pattern.

Melli has chosen a love blue and green variegated acrylic made by Michaels Loops & Threads Impeccable Worsted - a personal favorite yarn of mine.


The swatch made helps in establishing the proper sizing and for me is very important as I tend to knit very tightly.  (I will also point out that this is a vast improvement over the first squares I knitted which were typically entirely too loose!)


Friday, December 9, 2011

Knitted Mud Track Skull Hat - Pt 3

And finally, the hat is done!  I pretty much stopped using the pattern exactly and glanced at it here and there, as the decreased intercepted the design area.  I also took out about 7 or 8 rows so that hat wouldn't be too big and added an extra step when finishing.  But despite the frustration and long hours of work...it actually looks better than I expected - yay!


This will not be reproduced...

Giant Thread Art Goodness!

Previous to this post is the introductory one, but sure to check it out:  Peruvian Thread Art.

Now for a lovely photo tutorial, without much adieu!

This tutorial is based on what I did for my first piece, therefore it later may be turned into a video (which we'll feature on our YouTube Channel) or updated with more information.  For now this will suffice, so I highly suggest you check out other string art tutorials.  Although I'll try to add any helpful notes at the end and note pitfalls I noticed in my own work.


Gather your materials!


  • 12 g aluminum wire (or any large gauge wire pliable enough to bend into a frame)
  • mold (to wrap & shape large gauge wire, eg. a coffee mug)
  • 22/24 g wire (or some smaller gauge wire of your choice for coiling, we used Fun Wire)
  • wire cutters (to cut wire of course!)
  • US 2 knitting needle (to coil wire, needle should be approximately chosen to suit gauge of frame wire, using a needle gauge to check wire gauge then go up a size)
  • worsted weight cotton yarn (this is just what i used, you may use any weight you like, but I do not suggest anything larger than worsted as the strand will be too bulky; this also will be relative to your frame and coil wire size)

Some additional tools that are optional and helpful but not direly necessary:
  • Round nose pliers (for creating eyelet to hang pendant)
  • Bent nose pliers (for wrapping excess wire)


And now to the directions...


Wrap frame wire around the larger end of your mold.  This will make a circle (use if you like), to make a more teardrop shape as is traditionally seen with this art form move wire to smaller portion of mold and pull gently.  [Important note:  DO NOT coil your ends more than once to hold as you will have to uncoil to get the coiled wire on the frame.  This is a faux pas we noted and made our design process a little tricky as it was necessary to abuse the frame to unkink the wire.]


Hold end of wire parallel to needle and begin wrapping around needle.  We kept our coil wrapped loosely to allow space for the yarn and so that we didn't have to stretch out the coil too much.  [You can see our coils are not precisely evenly space, but this is okay.]


Gently slide coiled wire onto frame wire, making sure to keep spread coils evenly spaced (as much as possible!)  If you have trouble with this you can manipulate the coils some before and during wrapping, but not after.


Starting at the top, wrap yarn from some point in a straight line across frame.  There are a number of ways to do this and your choice will greatly affect how your finished piece looks.  As you see from the finished picture below it would have been better to not start out where we did, but for a first run through.  Experiment with this!  [It's also suggested that you stick to one yarn when using worsted as it's too thick to effectively use more than one, however with a lighter weight yarn or other fiber it may be possible.]

To finish...in my version I did not use any sort of adhesive to affix the thread, but it's highly suggestible to consider this.  Nail polish (clear) works well I have been told.

A final note, I did not measure anything, as I prefer to really eyeball my work as I'm doing it.  So my suggestion is to get a small skein of yarn (50 yards or so is more than enough), and about as much yardage on your wires.  This ensures that you will have enough to make at least one piece, without running out.


Happy Wrapping!

Aradia Goseling
of
Faith Works

Peruvian Thread Art...

So I'm a part of CafeMom and a member of a groups for crafty mama's there (but of course, why wouldn't I be?!)  Recently in this group I made a new friend, a real one even - not the type you friend and seldom talk to but one that I have rather frequent and indepth conversations with :D I <3 U Melli!

She's a lovely artist who makes thread art pendants and such (You can view her wares at her online store Melli's Trinkets on StorEnvy) and at one point we were talking about thread art.  Now I have seen it before and always admired it, but it looked so complicated I couldn't fathom trying it myself.  Finally after pouring over some Googled pictures of phenomenal art (the color choice really can make it *POP*) I look through her Pinterest (to which she had earlier alluded contained a tutorial) and gave it a shot at trying to understand it.  I was most pleasantly surprised to see that it was not as hard as I thought, yet very time consuming (though with a gorgeous end product it's well worth it...)

Of course, ever looking for more fun crafts to do, especially ones that involve fiber I am adding it to my list.  With some modifications.  As I greatly esteem my friend I would not want to "horn in on her business, especially as a novice".  However I feel our talents and imagination differ enough that such will not be the case. As I am largely a yarn artist I intend on making my own string art mega huge...I am as my tattoo artist once called me "a size queen".  (And while I laughed at him at that moment I realize it's all too true.)

What I hope with my own version of this art is to use bigger gauges and make larger pieces, not that I am averse to smaller ones.  I also want to use fibers and shapes that are not typically used.  I will be shortly writing a tutorial for "giant thread art goodness" which I'll share here.

~ Happy Wrapping! ~

Aradia Goseling
of
Faith Works

Sunday, December 4, 2011

December Updates

December is finally here which means the holiday buying season is drawing to a close.  Many people are making last minute purchases, but we'd like to remind you that if your pre-fabricated order hasn't been placed yet that we cannot guarantee that it will arrive by Christmas.  Any custom orders will not be available before the end of the month as well.  But don't let that stop you from buying handmade...


With the end of November both the "Lori Lace Window Scarf" and "Gratitude Shawl for Lissa" were finished and sent off to their respective owners.  Joy was expressed by both which always makes an artist happy!

Our hand stitched cards are still works in progress as we decide how they will each be displayed (we're thinking frame or matting with shrink wrap.  It's also come to light just how labor intensive the entire process is to produce one card too...(this wasn't quite expected.)

Additionally we have a baby shower gift basket in the making as well.  The initial one is a gift, but we'll be offering subsequent ones in "made to order" status only.  This basket will include a hand picked basket (which is pre-made by another vendor but later may be made by us), baby blanket, hat, a stuff toy, and some other goodies we've yet to determine.

So until 2012!  We wish you a Merry Christmas, Happy Hannukah, Merry Kwanzaa, Merry Yule, and otherwise a Happy Winter Season and New Year...!

Knitted Mud Track Skull Hat - Pt 2

As I mentioned in the last post there were bound to be more unforeseen challenges to this order...and I was right.  They came in the form of colorwork and the decisions on techniques used to carry yarn and otherwise hide it on the wrong side of the work without leaving a mass of ends or bulky knots.


Some color has invariably been moved about and of course the stitch type and changing texture adds to the visual element as well.

See the exciting conclusion to the project including finished pictures and comments Knitted Mud Track Skull Hat - Pt 3!

Knitted Mud Track Skull Hat - Pt 1

A few weeks ago I received a commission from an acquaintance about a hat.  Of course it couldn't be just any hat, and surely not a simple one, it had to be a 100% custom order.  While I love these, there are always more pitfalls involved than I realize unfortunately and that can be a real pain in the butt.

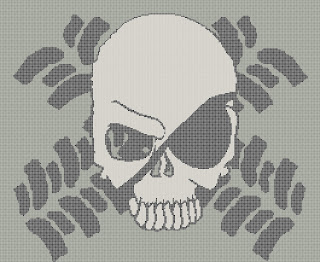
Initially the order started off shakily as it took more time than I anticipated to work out the details.  Thankfully I have my cross stitch charting program and a nice photoshop program that allowed me to great edit the base image from which the chart would be made.  Of course my eyes were bigger than my stomach as the design I ended up with was a good deal more complicated than I anticipated.

These...


Became this...


Now for those who have used charted designs before you know that what will come of a purely square graph on a small scale will not be such nice pretty line work.  But what resulted is still pretty great I think.


Even so however, the design is merely a guide.  While I tried to adhere some stitches just didn't want to behave...

Be sure to check out "Knitted Mud Track Skull Hat - Pt 2" for more pictures!

Contributors